
 Dr. Know
Introduction
In chromatography a syringe is something we normally do not think about. We take it, fill it, inject, rinse it and put it back. Or maybe the autosampler does these steps and we only put the syringe in the autosampler until it is damaged, and then we replace it. In fact, most of us use a syringe incorrectly, which at least influences the repeatability of our analyses.
Schematics

Figure 1: Normal syringe filled with sample volume and plunger in the barrel. Priming is necessary to get rid of the trapped air volume in the needle

Figure 2: Plunger-in-Needle syringe with volume in needle only, eliminating dead-volume
Terminations
The termination is the connection between the needle and the barrel. The simplest termination is the fixed or cemented needle, but there are also removable needle terminations with screw-type or Luer/Luer-Lok connections.
Needle Lengths
The typical needle length for gas- and/or liquid chromatographic applications is 50-51 mm (ca. 2 in.), but there are also other lengths like 70 mm, 75 mm, 95 mm, 100 mm, 107 mm, 110 mm and 115 mm.
Needle Gauges
The gauge size describes the outer diameter of a syringe needle. The gauge system is derived from wire manufacturing companies and is the analog to the mesh size as particle diameter derived from sieving.
Tables 1 and 2: Gauge-Millimeter (left) and Gauge-Inch (right) translation tables
The internal diameter for microliter (µL) syringes (marked green in the above tables) is in the range of 0.11 to 0.37 mm, depending on the outer diameter. If an S is used as suffix in the gauge size (like 26S), then the internal diameter is smaller (ID of 26 gauge needle is 0.26 mm, the ID of a 26S gauge needle is 0.13 mm, S = Small).
Point Styles
Point Styles | Description | ||
|---|---|---|---|
2 |  | Sharp needle point, beveled and curved. Recommended for septum penetration because it is not coring. | |
3 | LC |  | Blunt needle point for use in HPLC injection valves. |
4 | BV |  | Sharp beveled needle point (with a 12°-20° angle). Advised for life science applications. |
5 | H/D |  | Rounded conical needle point with side-hole. This not-coring style is recommended for septum penetrations. The style is also called domed needle tip (point style D without side-hole). |
AS | C |  | Conical point style for autosampler (AS) injections; another not-coring point style recommended for septum penetrations. |
Table 3: Point Styles
Plungers
Plungers for normal syringes, like the one in Figure 1, are primarily made of stainless steel rods with uniform diameter. The plunger moves inside the glass barrel.
Plungers for Plunger-in-Needle syringes are made of one thicker steel rod and a thinner one, that fits into the steel needle. The thicker part moves inside the glass barrel, the thinner part inside the steel needle.
Another type of syringe is the gas tight syringe, where a small PTFE plug sits at the top of the plunger to seal better within the glass barrel.
If a syringe is not cleaned after usage, especially when using salt-containing solvents, the small crystals will damage the syringe on plunger movement. That is like applying sandpaper to the surfaces of the barrel and the plunger. Aggressive liquid media, such as acidified solutions, basic solutions or solutions of aggressive components like boron trifluoride, halogenated organic acid chlorides, etc., will etch the steel of the plunger and needle, damaging the syringe.
Temperature Range
Microliter syringes can be used between 10 and 50 °C (50-122 °F) and cleaned at temperatures up to 115-120 °C (240-250 °F). Strong temperature difference during use can also damage the syringe by cracking the barrel or loosening the needle.
Always refer to the operator's manual and specifications to avoid damaging the syringe.
Accuracy
Microliter syringes are accurate within ±1% of the nominal volume (a 1-µL syringe is accurate within ±0.01 µL) with a precision of 1%. Hamilton measures this at 80% of their nominal volume (a 1-µL syringe is repeatedly tested at 0.8 µL), SGE at 100%. The test temperature is 25 °C.
Keep in mind that if you do 0.1 µL injections with a 1-µL syringe the accuracy still is 1% of the nominal volume, i.e. 0.1 µL ± 0.01 µL, which is a possible 10% deviation of the injection volume!
It is also advised to use a minimum injection volume of 20% of the nominal volume of the syringe to minimize errors, which is 0.2 µL volume if you use a 1-µL syringe and, therefore, a possible volume error of 5%.
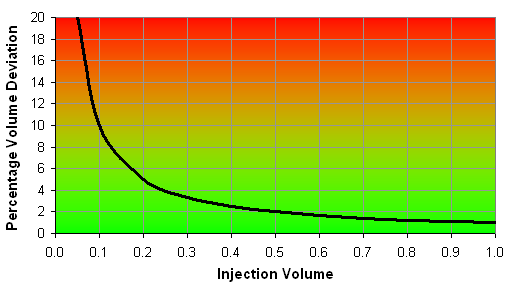
Figure 3: Percentage deviation of the injection volume of a 1-µL syringe
Usage Example
| INSPECT |
| Check the syringe for damages like barrel cracks or residues from previous injections. Verify that the plunger moves smoothly in the syringe. |
| GRIP |
| Hold the syringe by the flange where the glass is thicker, reducing the transfer of body heat to the barrel. |
| PRIME |
When you fill a syringe, the air volume in the needle wanders into the barrel, producing tiny air bubbles in the liquid, which have to be removed before adjusting the volume. Repeatedly draw and dispense the sample to remove the air bubbles.
Figure 4: Air bubbles in sample prior to priming |
| OVERFILL |
Fill the syringe with more sample volume than you want to inject.
Figure 5: Overfilling the syringe |
| REQUIRED VOLUME |
Slowly dispense the excess sample until only the required sample volume is in the syringe.
Figure 6: Dispensing excess sample |
| INJECT |
| Inject the sample into the chromatographic inlet with the appropriate injection technique and speed. |
| CLEAN |
| Rinse the syringe with an appropriate solvent. If possible, rinse again with water and, finally, rinse with some acetone. |
| STORE |
| Store the syringe in a safe place. |


