What are troubleshooting tips for addressing asymmetry/leaking connections, column breakage, and stuck ferrules when using the UltiMetal Plus Flexible Metal Ferrule?
Asymmetry / leaking connections
- • After pre-swaging the UltiMetal Plus Flexible Metal ferrule onto the column tubing, inspect the ferrule for symmetry.
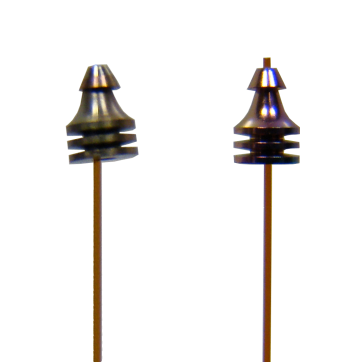
- • If the ferrule appears distorted, as shown by the figure on the left in the photo below, it is likely that the swaging tool (or swaging nut) has been damaged from over-tightening using standard metal ferrules.
- • Over tightening of hard metal ferrules, like Siltite ferrules, can damage the threads or sealing face of metal fittings. Once a fitting has been distorted, the flexible metal ferrules, or any other type of ferrule, may not seat properly, resulting in leaks.
|
|
|
|
Incorrect |
Correct |
- • Replace the swaging nut or swaging tool and repeat the process with a new flexible metal ferrule and the new hardware.
- • Asymmetry can also occur if the Capillary Flow Technique device has been damaged. Inspect the ferrule for asymmetry if experiencing leaking when connecting the column in the fitting.
Column breakage
The Flexible Metal ferrule was designed to be forgiving during the swaging process to reduce column breakage. However, they can still be over tightened, resulting in column damage.
The table below provides guidance for each flexible ferrule part number on approximately how much angular nut (for 10-32 thread) rotational torque is required to preswage a flexible metal ferrule from loose to column grip (swaged) onto the appropriate column tubing.
| Part number | Column ID | Angle, loose till swaged |
| G3188-27501 | 0.1 – 0.25 mm fused silica | 50 to 100 degrees |
| G3188-27502 | 0.32 mm fused silica | 30 to 70 degrees |
| G3188-27503 | 0.53 mm fused silica | 20 to 50 degrees |
| G3188-27504 | No hole | 60 degrees |
| G3188-27505 | 0.25-0.32 mm UltiMetal tubing | 40 to 90 degrees |
| G3188-27506 | 0.53 mm UltiMetal tubing | 20 to 50 degrees |
Use small (5 to 15 degrees at a time) increments when approaching the target angle on the table. Check to see if the ferrule is gripping the column each time, stop as soon as gripping occurs.
To make the column connection in the fitting, again use small (10-20 degree) increments with the ¼ inch open end wrench until a reliable, leak-free seal is made. This applies to all sizes of the Flexible Metal ferrule.
The design of the flexible metal ferrule reduces the probability of column breakage and minimizes the damage to the thread of the corresponding fittings caused by excessive stress.
Unlike other ferrule designs, a reliable leak-free seal is best made with the recommended torque angle– not force. Applying excessive torque will not provide a better seal. By compressing the flexible ferrule less, the column can be removed and reinstalled repeatedly with the same ferrule to minimize the damage to fittings.
Stuck ferrules
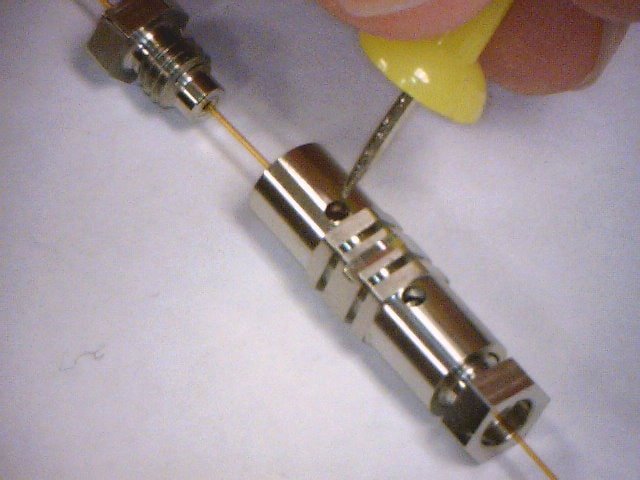
Properly swaged (not over-tightened) Flexible Metal ferrules can usually be extracted from the fitting by removal of the internal nut. If the ferrule does not release from the fitting, do not use the column to pull the ferrule out. Insert a pointed object (thumb pin, paper clip) into the ferrule release hole (see below) and press firmly. You will hear a click as the ferrule releases.


