Agilent checkout sample 05970-60045

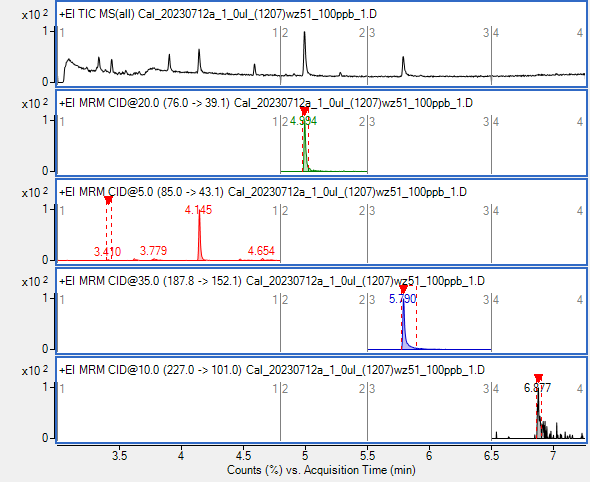
Can I use Agilent checkout sample 05970-60045 containing biphenyl, p-chlorodiphenyl, and methyl palmitate in isooctane (100ppb, 10ppm and 100ppm) for PQ- performance verification (just 100ppb and 10ppm only)? There is no certificate in the box for these compounds, methyl palmitate at 100ppb has low signal. What is your opinion , please? 

Parents
  • Methyl Palmitate is in that mix to show system activity, mostly injection port activity. 

    Cool off the injection port and the oven. Remove the column from the inlet and plug it by carefully pressing the open end into the edge of a septum. This will stop the vacuum from sucking air through the column while you are cleaning the injection port.

    On an S/SL injection port, remove the insulation cup and then the gold seal. At the top, remove the septum nut, septum, remove the liner retainer weldment from the top of the inlet and remove the liner and O ring.  Scrub the injection port weldment with three cotton tipped swabs held together and dipped into your normal sample solvent - or something similar.  It may take a few sets of swabs scrubbing up and down vigorously to clean the port. Then reassemble with a new gold seal and washer, the washer goes between the gold seal and the nut, a new liner and O ring, and a new septum that is not overtightened.  Cut about 25cm/10in off of the front of the column and install it with the end of the column 7 to 8 millimeters above the ferrule.

    On an MMI injection port, follow the instructions in the MMI cleaning kit and use the abrasive brush to thoroughly clean the bottom of the port.  Then use three cotton tipped swabs held together and dipped into your normal sample solvent and swab the port.  Column installation is 13 to 15 millimeters above the ferrule.

    (+) Column Installation - Split/Splitless and Multimode inlets =and= SQ and TQ MS transferlines - Files - GC/MS - Agilent Community

    After the column is reinstalled, wait at least five or ten minutes to purge the oxygen out of the column before heating it back up.

    Did you use the parameters from the Functionality test document here? 

     (+) Proving that an Agilent GC/MS system is fully functional - Files - GC/MS - Agilent Community

  • Dear Paul. I apologize for a late answer. Thank you also for the documents you placed here. 

    "Did you use the parameters from the Functionality test document here? "

    Yes, I did. My original method, I used in my previous analysis of GCMS Checkout mix was close to the one I received from your application. 

    Below there is a chromatogram of GCSM Checkout mix 6ppm after MMI cleaning.

    Black - analysis on 07/12/2023

    Red - the same standard run on 07/11/2023

    Do you think that the decreased signal for Methyl Palmitate (4th peak) is caused by still present contaminants in MMI injector (I thought I cleaned it well)? The decrease in Methyl Palmitate was seen already on a next day.

    Your application suggests that the depth of column in MMI should be around 14-15mm from ferrule (I got 10mm). Should I adjust mine to 14-15mm? Opposite to MMI regular length 10-12mm and keep it for regular analysis? Shouldn't all peaks be affected by the column position in injector?

    Here is a 100ppb standard (TIC and MRM) run on 07/12/2023

    and Methyl Palmitate alone (MRM)

    Thank you.

    Robert

  • Robert,  It's complicated, right? 

    A peak that is only 100 counts tall will vary.  Your peak sizes are very small. 100 counts at the detector is not very many ions making it all the way there.

    Scan vs SIM vs MRM will result in different answers. On a QQQ system, MS1 Scan will be different than MS2 Scan. The black and red ones were run using different MS parameters so cannot be compared to each other.

    Did you use the same vial two days in a row?  The same ampule?  Did the sample ever touch the vial cap septum?

    The correct column insertion distance for the MMI is 12-14 mm, not 10-12.   The column installation document shows why 14 to 15.5 is best.

    Peak areas/heights are affected by, in no particular order:  sample concentration, solvent choice, molecular weight, boiling point, expansion coefficient, injection port choice, inlet temperature, injection mode, injection volume, injection speed, syringe choice, liner choice, column inlet installation height, column MS installation distance, column inside diameter, column flow, injection port flows, injection port pressure, oven profile, carrier gas activity, inlet cleanliness, source cleanliness, MS tuning, MS acquisition parameters, and more.  It is a dance with many partners!   

    We must consider all those parameters to achieve reasonable response and typical reproducibility for each analysis.

    One example from an experiment I did with my favorite checkout sample, 05970-60045.  I installed the column with the normal insertion distance out of the MS transferline at the beginning of the test. After each three injections, I loosened the transferline nut and pulled the column back, then retightened it.  I pulled it back in increments until 50mm was withdrawn from the source. The only peak that showed any real change was the methyl palmitate peak and only after the column was pulled back 25 mm.  That one change only affected one peak in this sample.

    If the first three peaks are good, good chromatographic peak shape, reasonable response, reasonable spectra, reasonable overlaid TICs ---  the GC and MS hardware are working and there is nothing to repair. If Methyl Palmitate is lower or variable, it's a getting it into the column or cleanliness/activity related issue.  That's the reason methyl palmitate is included in that mixture.

  • Dear Paul. Thank you for your detailed information. 

    I run GCMS Checkout samples in MRM mode (including SCAN for MS2). 

    Yes, I may admit, that sample in the vial could touch the vial cap septum. And I was making the injections from the same ampule in a few days. 

    The column depth 10mm was set by Agilent serviceman. I will adjust it to 14-15mm and run a new 10ppm ampule again (but probably in 3 weeks , since I have to do some work on LCMS).  

    Here is a precision of 5 injections. I have 10ul syringe only. 

    Biphenyl  Dodecane p-chlorodiphenyl Methyl Palmitate
    RSD% SCAN SCAN SCAN SCAN 10ppm std
    3ppm 3.6 3.3 3.3 15.1 0.3ul
    6ppm 1.2 1.4 1.8 6.3 0.6ul
    9ppm 0.9 0.9 1.0 2.7 0.9ul
    Biphenyl  Dodecane p-chlorodiphenyl Methyl Palmitate
    RSD% MRM MRM MRM MRM 10ppm std
    3ppm 3.4 4.5 2.2 15 0.3ul
    6ppm 1.6 0.8 1.8 5.7 0.6ul
    9ppm 0.8 0.8 1.8 2.3 0.9ul

    Thank you again.

    Robert

Reply
  • Dear Paul. Thank you for your detailed information. 

    I run GCMS Checkout samples in MRM mode (including SCAN for MS2). 

    Yes, I may admit, that sample in the vial could touch the vial cap septum. And I was making the injections from the same ampule in a few days. 

    The column depth 10mm was set by Agilent serviceman. I will adjust it to 14-15mm and run a new 10ppm ampule again (but probably in 3 weeks , since I have to do some work on LCMS).  

    Here is a precision of 5 injections. I have 10ul syringe only. 

    Biphenyl  Dodecane p-chlorodiphenyl Methyl Palmitate
    RSD% SCAN SCAN SCAN SCAN 10ppm std
    3ppm 3.6 3.3 3.3 15.1 0.3ul
    6ppm 1.2 1.4 1.8 6.3 0.6ul
    9ppm 0.9 0.9 1.0 2.7 0.9ul
    Biphenyl  Dodecane p-chlorodiphenyl Methyl Palmitate
    RSD% MRM MRM MRM MRM 10ppm std
    3ppm 3.4 4.5 2.2 15 0.3ul
    6ppm 1.6 0.8 1.8 5.7 0.6ul
    9ppm 0.8 0.8 1.8 2.3 0.9ul

    Thank you again.

    Robert

Children
  • If you want to try to use the same vial more than one day you can do today's injections and then change the vial cap to a new one. That is not perfect but better than leaving it in a pierced cap vial which will lose some amount of volatile compounds.   The other thing to try after today's injections is to put a piece of aluminum foil over the vial and then screw on a new cap. 

    The sample's solvent touching the vial cap septum can lead to extraneous peaks. This is the same advice as to never to use quality solvents out of a plastic squirt bottle or disposable pipette. I try to only pour the test mix from the ampule into the sampler vial and then hold it carefully upright to avoid any possibly issues.

    The 0.3, 0.6, 0.9 uL using a 10uL syringe works well enough for demonstrating that the instrument is working. I would not suggest it for any real percent RSD values as your data shows. I didn't have a 1uL syringe to try at the time when I was developing that document and most labs don't have a 1uL syringe. Less than 2% or 3% RSD is great. Some operators have samples where they are happy at <25%RSD. 

    Thank you for the data!

Was this helpful?