

In the earlier 2 posts, I have discussed about 1. The merits of automated sampling and 2. Validation of automated dissolution system. Thank you for giving our team warm response for these blogs. We received many queries regarding automated sampling on Dissolution hotline. We tried to provide a solution to each question asked.
We identified that many of the readers and current Agilent dissolution customers want some more insights on most competent way of usage and maintenance of Agilent dissolution apparatus 708-DS and sampling station 850-DS. So, I have come up with this blog summarizing some valuable information and resources on how to make the most of your Agilent automated dissolution system.
How to define parameters for automated dissolution method in 850-DS?
 While performing automated dissolution with 850-DS, you must set 2 types of parameters to get correct sampling.
1. Instrument/system parameters defined in the Instrument settings and
2. Method parameters which are to be set in your method properties.
The method parameters like vessel temperature, bath temperature, spindle speed, media volume etc. can easily be defined from the literature of the dissolution method. Here is some guidance for the other method parameters and instrument parameters.
|
Instrument/system parameters |
Method parameters |
|
1. Prime loss volume: It is the volume of fluidic path from the sampling point to the place of analysis/collection. Prime loss volume helps 850-DS to calculate time and volume required for sampling so that sample from correct time is analyzed by cary60 in case of online analysis or collected in test tube/vial for offline analysis. |
1. Prime volume: It is the volume of the media pulled from the vessel to prime the line prior to pulling a sample. Manifolds are down and volume is primed through the sampling cannula, tubings, syringes, return lines and flow cells also if connected. It ensures that lines are full prior to pulling a sample and helps to overcome the dilution of samples. |
|
2. Aspiration dwell volume: This is the time for which syringe pump stops after pulling a stroke. It allows liquid in syringe to pull through before it is pushed forward for analysis/collection. More viscous media or media with surfactants require longer aspiration dwell time. |
2. Purge volume: It is the volume of air to purge through the return cannula after sample collection is completed. It ensures that lines are emptied of the current sample before pulling the next one and thus stops potential dilution. |
|
3. Pump speed: It is the speed of the liquid movement through the sampling lines. More viscous media or media containing surfactants would benefit from reduced pump speed. |
3. Waste drop volume: It is the volume of sample being pushed through the sampling needles prior to dispensing the sample in vials/test tubes. In simple words, it is priming of needles to ensure volume accuracy and sample concentration. |
|
|
4. Sample volume: It is the volume required for analysis or to fill the vial/test tube. |
From the mentioned parameters, the method parameters should be determined according to the complexity of material being analyzed and the analytical method. You have to make some reasonable trial and error efforts to determine these parameters. In the case of Instrument parameters, the aspiration dwell time and pump speed both depend upon the dissolution media and again the material being analyzed.
Here, I am going to discuss more about how you can calculate the Prime loss volume for your automated system. It is one of the most important parameters to define for correct sampling.
How to determine the Prime Loss Volume for your automated system?
As mentioned before, Prime loss volume is the system parameter. So, you can have the prime loss volume once calculated and saved for the setup of your automated dissolution system. You don’t have to re-calculate it until you replace some tubings or make some modification in the setup.
Follow these steps to determine prime loss volume for your system using 850-DS screen:
1. Place one sampling canula in a beaker filled with water. Go to Diagnostic tab on the 850-DS screen.

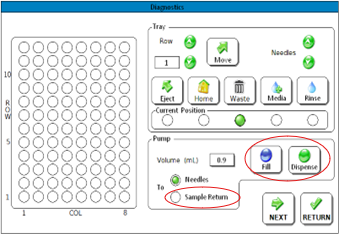
2. Select Sample Return option in the pump section. Now, pump as many 1mL water Fill and Dispense cycles until the lines are fully primed (until you can see the water coming out of the return lines).
3. Remove the canula from the beaker.
4. Weigh one empty test tube and place it into 850-DS test tube rack. Drive the test tube rack to sample position, lower the needles. Select Needles option in the pump section.
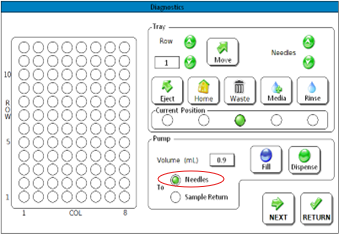
5. Make sure that the sampling canula is in the air. Now, cycle the pump until the lines are empty (only air will be coming out). Then, eject the sample rack and weigh the test tube again. With the difference in the weight, you can determine the Prime loss volume of the system.
I hope, with this guidance, you will be able to create an accurate method for your Agilent automated dissolution setup.
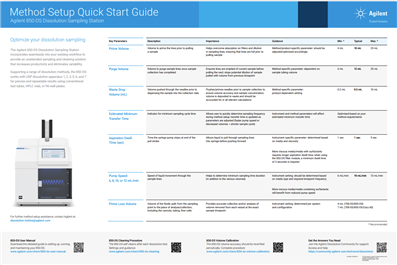
Please refer to the 850-DS method setup quick start guide.
You can print this poster out and have it in your lab or you can request one free for your lab.
Tricks and tips videos from Agilent product specialist:
Here are some tricks and tips videos from our Product specialist Gerald Huber in Europe. He has shared great insights on handling the Agilent dissolution tester and sampling station.
-
Dissolution testing: Tricks and tips for Dissolution tester 708-DS
-
Dissolution testing: Tricks and tips for Dissolution sampling station 850-DS
Some useful technical overviews for 708-DS and 850-DS:
I have enlisted a few documents from Agilent. These technical overviews contain valuable information regarding the best way of operating and maintaining 708-DS and 850-DS.
- Agilent 850-DS sampling station volume calibration guide
- Agilent 850-DS sampling station: cleaning validation guide
- Agilent 708-DS Dissolution apparatus: Programming sampling depth
- Agilent 708-DS Dissolution apparatus: Pre-Test preparation in under a minute
- Filter Validation Protocol
I hope you have found this blog useful. Do bookmark this one and share with your colleagues who might have the same queries regarding automated sampling. Please reach out to us directly at Dissolution hotline for any queries. For more information and support, check out the following resources from Agilent’s Dissolution team of experts.
- Dissolution upcoming and previously recorded webinars series by experts
- Ask the experts in Dissolution community